
I really enjoy decorating for the holidays and when i came up with idea to make these chair covers i was so excited. I love the way they add subtle color and festive-ness to my kitchen, and guess what they are such a simple sewing project. Seriously, you can totally whip out your sewing machine and make these easter egg chair back covers. Keep reading for the full tutorial!
Base Fabric, the amount depends on the size of your chair but i bought 3 yards and had extra
Egg Fabric, 1/4 yard of each print is more than enough, i used 5 different prints, but you could do less
Heat Bond
Thread
Thick Paper to make your egg pattern
1. Measure your chairs. Mine were 18″ wide by 18″ height (from the seat to the top of the chair back). I made the chair covers 18 1/2″ wide (so they would fit over easily) and 18″ long.
2. Decide how large you want your egg. My egg was 11″ long and then 8 1/2″ at the widest part. Make your pattern- i just folded my cardstock in half and freehanded half of the egg so both sides would be the same.
3. On your egg pattern divide it up with drawn lines as to how you want the pieced egg to look. I went 1 1/2″, 1″, 1″ and then repeated it. After seeing how many strips i would need i started to cut the strips.
4. To cut out the strips of fabric for the egg you must add seam allowance- i only add 1/4″ seam allowance on both sides, so for the 1 1/2″ pieces i cut 2″ strips. I made sure all my strips were 9″ so they were long enough no matter where they ended up on the egg. I decided to make 4 chair covers so i cut enough for 4 eggs at the same time.
5. Once you have your strips cut out sew them together, piece by piece. You will end up with a big rectangle, you can see mine in the photos below.
6. Use the egg pattern and lay it on the back of the heat bond and trace it. Cut it out.
7. attach the heat bond by ironing to the back of the pieced rectangle. Leave the paper on for now and cut around the egg. Now you have our pieced egg finished and ready to iron on to the chair cover!

Make your chair cover
1. Cut out your fabric. I measured a piece of fabric that was 1″ larger than my finished measurement, so since i wanted it to be 18 1/2″ finished i cut a 19 1/2″ wide piece, so that i would have 1/2″ seam allowances. Cut out the side part or the “gusset”, my chairs are about 2″ wide so i cut out 2 side pieces that are 3″ x 19″.
2. Cut a notch at the top of your gusset at the halfway point, you can see below mine was at 1 1/2″. Match that center notch up with the halfway point, or what would be the “top” of the chair cover, in the large piece of fabric. Place a pin at the center then on each end of the 3″ piece 1/2″ from the ends. Again look at the photos below for a better explanation.
3. You want to sew across the top from end to end leaving 1/2″ on each side unsewn.
4. Pivot the fabric and match up the the side of the smaller piece to the side of the larger piece. Pin down the side. There will be a fold at the corner that will flatten out if you cut a small notch on the piece of the larger fabric, see the photo below.
5. Sew down the side at 1/2″ seam allowance
6. Do the same for the opposite side to complete the side seam of the chair cover.
7. Repeat 3-6 on the other side.
8. Iron those seams open and flip right side out and iron the sides again if needed.
9. Hem by folding the bottom under 1/2″ and then 1/2″ again and sewing across.

Attach The Easter Egg
1. Decide where you want the egg placed on the chair cover, i centered mine and then moved it about 4″ down from the top. Once you decide on a placement remove the paper and iron on to the fabric.
2. You can leave it as is or finish it off with a stitch around the egg. I used an “overlock” stick on my home sewing machine to add a fun little detail to finish it off.
If you make some chair covers please instagram them, i’d love to see!! @Handmadeintheheartland.com
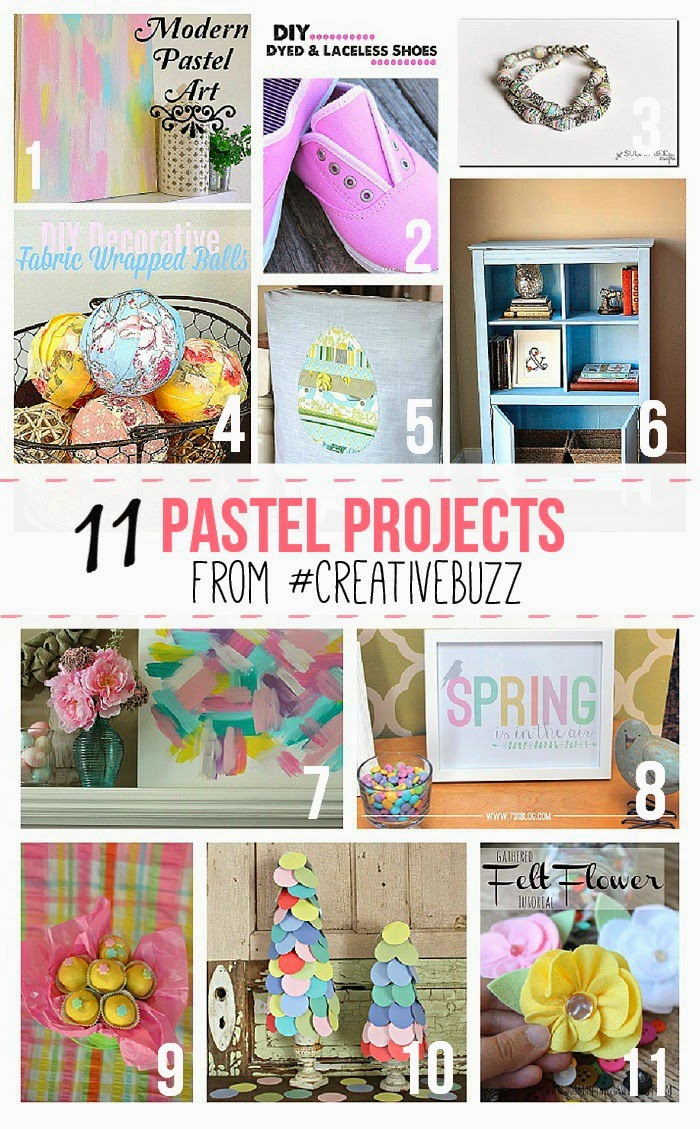
Today’s project was a part of the #creativebuzz. These ladies are all so talented so please check out their pastel projects by clicking the links below!
1. Modern Pastel Art from Tied Ribbon
2. Diy Dyed & Laceless Shoes from Made to be a Momma
3. Rolled Paper Bead Bracelet from Sugar Bee Crafts
4. Diy Decorative Fabric Wrapped Balls from This Silly Girl’s Life
5. Easter Egg Chair Back Covers from Handmade in the Heartland
6. Pastel Bookshelf Makeover from Carissa Miss
7. DIY Modern Art and Free Pillow Templates for Spring from All Things With Purpose
8. Spring is in the Air & Spring is Here Free Printable from 733Blog
9. Spring Oreo Truffles from Just Us Four
10. Pastel Confetti Trees from One Krieger Chick
11. Gathered Felt Flower Tutorial from Do Small Things with Love
Easter Decor - Easy DIY Ideas For the Home - Mama In Shape
Sunday 28th of February 2021
[…] If you really enjoy decorating for the holidays then you will surely love the idea of making these Easter egg chair covers. They will add subtle color and festiveness to your kitchen, and guess what, they are such a simple sewing project. Check it here. […]