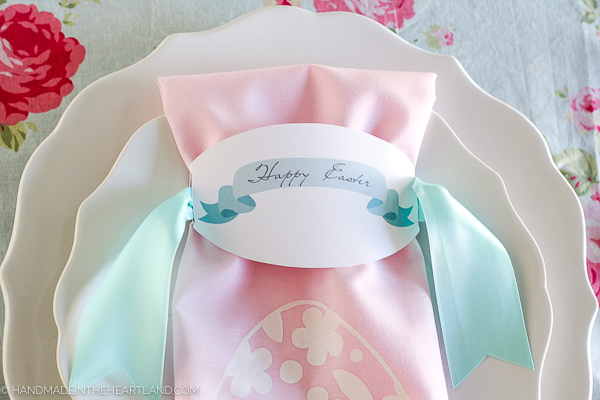
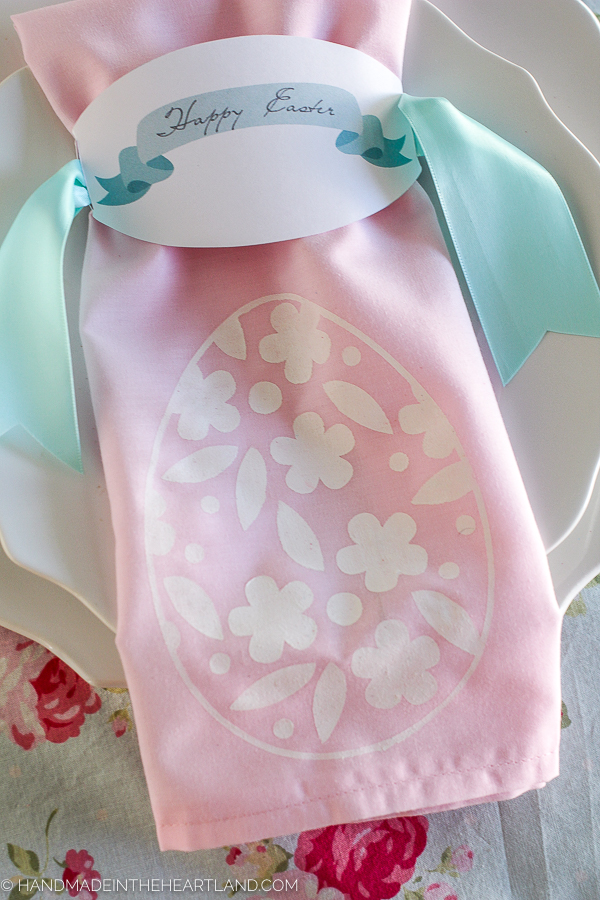
Make your Easter table a little bit more festive with custom painted napkins and a free printable paper Easter napkin ring. This post is a tutorial for how to make your very own using the Cricut Explore. This post is sponsored by Cricut, all opinions are always mine! This post contains affiliate links.

I love dressing up an Easter table and with a few quick do it yourself ideas you can customize your table in no time! The options for painted napkins are endless, I decided to do an Easter egg in white paint on a simple pink napkin. I used my favorite crafting weapon- my Cricut Explore, I love it! If you don’t believe me check out all my other Cricut projects.
I also created a free paper printable napkin ring for you. You can download it HERE. Just use an exacto knife to cut slits on the sides of the oval and insert your ribbon into them.

Painted Easter Napkin Supplies:
Fabric Napkin
Fabric Paint
Foam Paintbrush

I use this technique quite often and I love that I can make any kind of stencil I want. The stencil vinyl is so great, I love that it’s adhesive so it really helps the paint not bleed and spill over. I’ve used a lot of stencils and I hate when I accidentally move a plastic one and it ruins the project!
Make sure to watch the video below to see how to cut the Easter Egg in the Cricut Design Space!
Painted Easter Napkin Instructions:
Step 1: Cut the Easter Egg on Stencil Vinyl using your Cricut Explore machine. Remove or weed the vinyl that you don’t want on your stencil– so the area that you do want to be painted. Using transfer tape or transfer vinyl move the stencil to your napkin. I centered my Egg on the bottom part of the napkin.
Step 2: Paint the fabric. I like to place my fabric on cardboard, the paint will bleed through onto whatever surface you have your napkin placed. When you are painting the stencil use a foam brush and lightly dab a layer of paint on. Try not to overload the paintbrush, too much paint can lead to spilling. Let dry for an hour or so and then remove the stencil!
If you make these please let me know! It thrills me to see you using ideas from the blog! Leave a comment or tag me on Instagram (@handmadeintheheartland) or facebook!
This is a sponsored conversation written by me on behalf of Cricut. The opinions and text are all mine.
7 Easy Easter Ideas for Your Easter Brunch At Home - Bright Star Crafters
Wednesday 12th of January 2022
[…] florals and a hint of spring in your Easter-themed brunch? Make an Easter napkin with an egg-shaped design for your tablescape. With just a plain pastel napkin and HTV, it’ll […]
7 Easy Easter Brunch Ideas To Make With Your Cricut - Bright Star Crafters
Tuesday 11th of January 2022
[…] and spring for your Easter-themed brunch? A nice pastel Easter napkin with an egg-shaped, floral-filled design will definitely give your tablescape a dainty flair. With […]
Book Page Easter Egg Wreath | Handmade in the Heartland
Thursday 18th of March 2021
[…] for more fun Easter ideas? Decorate your Easter table with these beautiful painted Easter egg napkins. Or get out your sewing machine and make these beautiful Easter egg chair back […]
Easter Decor - Easy DIY Ideas For the Home - Mama In Shape
Sunday 28th of February 2021
[…] Make your Easter table a little bit more festive with custom-painted napkins and a printable paper Easter napkin ring. Learn how to make your very own using the Cricut Explore. Check it here. […]